This article is the sixth in a continuing series on the use of decision modeling and optimization techniques for game design. The full list of articles includes:
- Part 1: Introduction (Blogspot) (Gamasutra)
- Part 2: Optimization Basics and Unrolling a Simulation (Blogspot) (Gamasutra)
- Part 3: Allocation and Facility Location Problems (Blogspot) (Gamasutra)
- Part 4: Competitive Balancing Problems (Blogspot) (Gamasutra)
- Part 5: Class Assignment Problems (Blogspot) (Gamasutra)
- Part 6: Parametric Design Techniques (Blogspot) (Gamasutra)
- Part 7: Production Queues (Blogspot) (Gamasutra)
- Part 8: Graph Search (Blogspot) (Gamasutra)
- Part 9: Modular Level Design (Blogspot) (Gamasutra)
Introduction
In the previous articles in this series, we introduced the concepts behind decision modeling and optimization and explained how they can be helpful in framing and optimizing a surprising number of design decisions.We also discussed their limitations, and we showed a number of examples of how they can be used to find optimal player strategies in certain cases and to help optimize design decisions directly (see links above).
In this installment, we're going to slow down a bit, and simplify.
We're also going to get much more practical, and how how you can use a very simple decision model to frame certain kinds of parametric design problems. We'll also discuss the broader practical applications of this approach, including how we used this approach in our recent iOS/Android strategy game, City Conquest.
Designing Towers
Imagine for a moment that you want to design a tower defense game. You know that you have enough production resources available to create 8 unique towers. How do you go about framing the problem and deciding the best set of 8 towers to include in your game?
Obviously, you could just go and come up with a bunch of ideas for towers, and then just pick the best out of that group. That's a start.
Or maybe you could look at some existing tower defense games, like FieldRunners and Kingdom Rush or any of the popular tower defense mods for StarCraft 2, and then experiment with variations on the towers in those kinds of games.
But that's not a very disciplined approach, is it?
If we're just coming up with random ideas, how do we know we haven't randomly chosen a lot of bad ones, or that we couldn't have randomly chosen a bunch of better ones?
When we design our towers, how do we give ourselves some sort of disciplined basis for deciding that one tower design is better than another? And how do we know that once we've got our set of 8 towers, that the configuration we've chosen is the best set of 8 towers for our game? Is that even possible?
For that to happen, we'd have to invent some definition of "best" in terms of how appropriate they are for our game, how interesting they are, and how well they suit our design goals.
Obviously, that's a bit of a stretch. That kind of definition of "best" isn't going to be something we can encode in any sort of function. And there's obviously no way to have a spreadsheet pick out how "interesting" something is; that's a judgement call and we'll have to do it ourselves.
Let's take a step back.
In an ideal world, our process for picking the towers should probably look something like this:
- First, we'd explicitly specify our design goals. We'd write down on a sheet of paper exactly what we're trying to accomplish with the design of our towers. This forces us to clarify our thoughts about the design up front so that we don't go rushing into the tower design problem recklessly and have the bigger picture in mind.
- Then, we'd set up some sort of framework for making the tower design decision, so that we're designing the full set of towers as an organic whole rather than taking a bunch of towers that were designed separately and throwing them all together.
Our design goals could include things like uniqueness (every tower should be significantly different from all the others and should play a unique tactical role), usefulness (there should be some situations where each tower is the most useful), and balance (every tower should be appropriately powerful and should have a cost appropriate for its utility).
(You can find a partial list of my own design goals for my recent iOS/Android game City Conquest in the February 2012 interview on AiGameDev).
So, let's assume we've done that, and we have our goals clearly defined on an 8.5"x11" piece of paper. How do we then define a framework for the design decision?
Design Parameters
If you look at tower defense games that have a large number of tower types, such as the excellent Element Tower Defense mod for StarCraft 2, or if you look at a large number of tower designs across a broad selection of tower defense games, you'll notice a clear pattern. All of these tower designs seem to be based on a combination of parameters: they have some method of applying damage, and apply some number of effects, such as damage or healing or slowing.
This is very similar to the way I approached the design of the towers in City Conquest. Even though City Conquest is more of a tower defense / real-time strategy hybrid, the tower design is similar enough to a tower defense game that it's worth considering.
The image below shows some of the different towers available in the game. The full set of towers was designed together, as a whole, by matching different attack mechanisms with different effects as we describe in this article, in order to ensure that they were as unique as possible and satisfied our design goals.
For example, along the top row of the image, we have the Chiller Unit (upper-left, which emanates slowing in a radius around itself), the Laser (which fires slowly and damages units in a long, straight line), the Grenade Tosser (which lobs ground-to-ground projectiles that do wide area damage on impact), the Gun Turret (which fires rapid plasma bursts at air and ground targets), and the Missile Launcher (which fires homing missiles at air and ground targets and does a small amount of radial area damage in addition to its direct damage).

Each tower can be viewed as having two fundamental parameter types:
- A mechanism of action. This defines the way the tower applies its effect to the enemy units (or, in some cases, to friendly units or to other nearby towers).
- An effect. This is what the tower actually does, and what sort of damage or healing or anything else that it actually applies.
- Instantaneous shot
- Ground-to-ground projectile
- Ground-to-air projectile
- Homing projectile (can target both air and ground; seeks to target)
- Circular blast around tower
- Electric arc (hits multiple nearby units in sequence)
- Conical spray
- Linear beam (fires over any number of tiles in sequence along a straight line)
- Fast direct damage (i.e. rapid fire against a single unit)
- Slow direct damage (i.e. heavy fire against a single unit with a long cycle time)
- Direct damage + area-of-effect (AoE) splash (i.e. damage against a single unit with a small amount of splash damage against other units nearby)
- Area of effect (AoE) damage only (shockwave)
- Slow: slows affected enemy units for a short period of time
- Stun: stops affected enemy units for a short period of time
- Weaken/debuff: weakens affected enemy units for a short period of time so that they take more damage from all sources while affected by the "debuff"
- Absorb health: absorb some of the unit's health and apply it to this tower
- Remove buffs: remove any special "buffs" from the affected unit, such as any speed or health or damage enhancements
- Push back: push the unit backward a short distance
(This is only a partial list, of course; we could have any number of "effects," such as turning units invisible, turning them into zombies, or what have you. This list is only for the sake of the example and the reader is invited to make up his or her own list as needed.)
We should be able to define our towers as a combination of one mechanism and one or more effects.
If we do this, the question then becomes, which towers get which mechanisms and which effects?
Once we answer that question, we'll know each tower's role in the game, and this defines its personality, and we can then use that to determine the tower's visual style and start working on concept art.
We have 8 mechanism types, and 10 effects. So each tower will have one of the 8 mechanisms and one of the 10 effects, but 2 of the effects will go unused. That's fine.
Of course, there are lots of other ways we could do this, such as by giving each tower multiple effects or allowing it to change mechanisms or effects over time, but for the sake of brevity we'll leave those as an exercise for the reader.
Applications
Of course, the point of the article isn't about tower defense games; it's about modeling decisions. These are all sorts of situations in game design where we need to design a large number of entities in particular functional roles. For example:
Many games already openly embrace parametric design. Gearbox Software's Borderlands famously embraced parametric design for its weapons, boasting over 17,500,000 different varieties of weapons due to the ability to create new guns based on different parameter combinations. A recent Gamasutra article on the evolutionary system behind Team Blockhead Wars described a similar approach based on 10 parameters for each weapon.
Some might criticize this approach as "slot machine design." There's some truth to this criticism; this kind of process can easily result in unit/enemy/tower/spell designs that feel rote and formulaic if we're not careful.
But this is not a fundamental problem with the approach itself. This approach is only a tool, and like any design tool, it has to be used with caution in the context of the broader design to ensure that the parametric design never has a negative impact on the player experience.
In particular, we have to avoid falling into the cognitive trap of assuming that quantity equals quality, or that it necessarily even contributes to quality. Any number of interesting choices we present the player will always provide a better experience than an infinite number of boring choices.
- Designing buildings or units in a strategy game
- Designing guns, vehicles, or enemies in a first-person shooter
- Designing creatures and character classes in a MOBA (multiplayer online battle arena) action game
- Designing spells, enemies, character classes, or loot in a role-playing game
Many games already openly embrace parametric design. Gearbox Software's Borderlands famously embraced parametric design for its weapons, boasting over 17,500,000 different varieties of weapons due to the ability to create new guns based on different parameter combinations. A recent Gamasutra article on the evolutionary system behind Team Blockhead Wars described a similar approach based on 10 parameters for each weapon.
Some might criticize this approach as "slot machine design." There's some truth to this criticism; this kind of process can easily result in unit/enemy/tower/spell designs that feel rote and formulaic if we're not careful.
But this is not a fundamental problem with the approach itself. This approach is only a tool, and like any design tool, it has to be used with caution in the context of the broader design to ensure that the parametric design never has a negative impact on the player experience.
In particular, we have to avoid falling into the cognitive trap of assuming that quantity equals quality, or that it necessarily even contributes to quality. Any number of interesting choices we present the player will always provide a better experience than an infinite number of boring choices.
Tower Design Problem: Setup
Just as with previous articles, we're now going to show you how to model this problem in Excel as a decision model and then use Solver to optimize it. Unlike the previous articles, though, this article shows what's essentially a subjective design process, where the numbers represent our own opinions as designers.
We'll start by simply making a table. We'll enumerate the towers' possible "mechanisms" along the horizontal axis and the "effects" along the vertical axis. This is the "Decision Table."
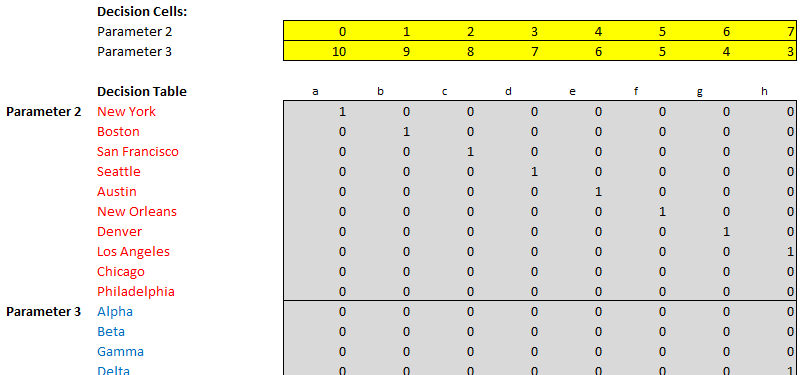
Then, just above that, we make a row of cells: the "Decision Cells." Since each of the 8 mechanisms has to be mapped to exactly one effect, we only need these 8 decision cells.

We're going to ask Excel Solver to fill in each of these decision cells with a value from 0 to 9 (inclusive) to represent which of the 10 effects they're mapped to. Since they're the decision variables, we've also highlighted them in yellow, as per our formatting standards from Part 2.
The grey cells in the Decision Table below that simply show a '1' value if the corresponding decision cell (the yellow cell in the same column) equals its row index, or a '0' otherwise. You can see above that the decision cell values "1 2 3 4 5 ..." result in a down-sweeping diagonal of '1' values.
[At this point, you may be a bit incredulous. How can we really set up a table to solve this problem? After all, if there are 8 tower mechanisms and 10 effects in our list, there's a huge number of possible permutations -- if each tower is assigned one unique effect, that's around 1.8 million possible combinations. Surely we can't search through all of those and find the best one?
But of course, we're not going to do that. We're just going to use Solver to help us make this decision. All we really need to do is find the first combination that looks good. If we don't like what Solver gives us, we can ask it to give us another one.]
Back to the spreadsheet: we now create a second table with a set of weights. This table will list our own subjective preferences for any given combination of a tower's mechanism and effect.
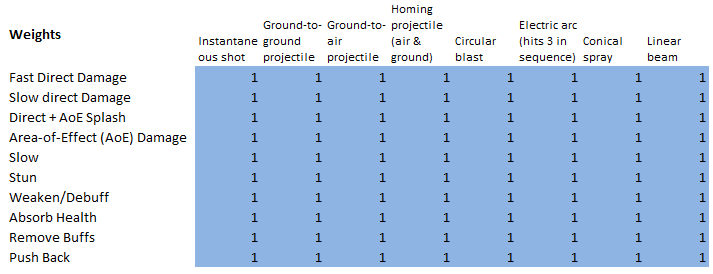
We initially fill this table in with '1' values for anything. As we design our towers, we'll work by changing the values in this table. A '1' means that the given combination is acceptable and a '0' indicates that it's forbidden for some reason.
For example, we might decide that a particular combination just doesn't make sense, or doesn't satisfy our design goals, so we'd set the weight for that combination to 0. We might also decide to use this to ensure that our game is too similar to another game -- for example, "Instantaneous Shot + Fast Direct Damage" is too similar to the machine gun tower from FieldRunners, while "Homing Projectile + Slow Direct Damage" is too similar to that game's rocket launcher, so we might set those values to 0.
In the same way, if we've already made up our mind that a certain mechanism/effect combination should be in the game, we can fill in a '1' in that cell and a '0' in all other cells in the same row and column. This will force the Solver to exclude any other towers from using that same mechanism or effect.
We can also use this table to specify preferences. A value between 0 and 1 will indicate that the combination is less desirable than another combination, while a value greater than 1 can indicate that it's more desirable to whatever degree. (You could also think of these as representing relative utilities in utility theory).
Finally, we make a third table that combines the Decision Table with the Weight Table. This is the Combined Output Table, shown below.

Each of the cells in the Combined Output Table multiplies the corresponding cell in the Decision Table against the corresponding cell in the Weight Table, so that if either of the two values is 0, the resulting value is 0 in the Combined Output Table.
Also, you'll note the columns along the right side of the table, labeled 'Min,' 'Used,' and 'Max.' The 'Used' column (in grey) count the number of nonzero entries in the corresponding row and column in the table, and 'Min' and 'Max' allow you to set what the minimum and maximum values should be for those values.
Note in particular the implementation of the "Used" column. Since we can use non-integer weights in the Weights Table, we don't want to use the "=SUM()" formula for this. Instead, we use Excel's "=COUNTIF(range,">0")" for this in order to count the number of nonzero weights, not sum them up.
In the lower right corner is the objective function. This cell just sums up the total value of the entire Combined Output Table, and as such, it represents our current preferences in the Weights table multiplied by our design decisions from the Decision Table. We will ask Solver to maximize the value of this cell.
Tower Design Problem: Solving
- Try to set the correct weights for every single weight in the Weights Table, and then attempt to solve.
- Set every weight in the Weights Table to 1, run Solver, and then adjust the weights only when we don't like the solution.
Either approach is valid. However, we're going to take the latter approach because it's quicker. The former approach forces us to figure out a weight for every possible (mechanism, effect) combination,
Our process will look like this:
- Set up all the weight values in the Weights Table with weighting values we think are appropriate.
- Run Solver.
- Take a look at Solver's solution and figure out if we like the solution it gives us.
- If not, go through all the tower combinations we don't like, set the corresponding weights for those combinations in the Weights Table to 0, and return to step 2.
This might take a little time. It might be 5-10 run-throughs before we find a combination that we like. That shouldn't take long, though; the hard part is just getting the spreadsheet and Solver set up. Once we do that, actually running it and tweaking the Weights Table will only take a few seconds.
For our initial setup, we have the following, the same as shown above:

The value of the Objective cell is 8, which is the total value of all the green cells (note that we use Excel's conditional formatting here to color the cells inside this table according to their values and make the table easier to read).
This result is suggesting we should have an instantaneous-shot weapon that does slow direct damage ... a ground-to-ground projectile that does direct damage plus an area-of-effect ("AoE") splash ... a ground-to-air projectile that does AoE damage only ... and so on.
Some of these tower designs make sense, but three of them seem a bit silly.
- The ground-to-air projectile that does AoE damage only is probably a bad idea. This will be the only solely anti-air tower, and we probably want it to do some kind of direct damage so that it can be useful against individual flying enemies.
- The homing projectile with the slow effect is also probably a bad idea. We'll probably want more enemies to be affected by the slowing effect than what we'd get with a homing projectile.
- The linear beam that removes buffs also seems pretty silly. This seems like a giant laser weapon that can fire through long groups of tiles at a time, so we probably want that to do direct damage of some sort.
(If you can't find Solver or you don't have it installed in your copy of Excel, see the instructions in Part 2 of this series.)

The decision cells ("By Changing Variable Cells") are the row of yellow Decision Cells just above the Decision Table. The other constraints in the Solver dialog simply indicate that the decision cells are integer values between 0 and 9 (to represent the 10 possible effects that they can map to), and that all the constraints on the right side of the Combined Output Table need to apply (that is, the values in the "Used" column need to be greater than or equal to the corresponding "Min" values and less than or equal to the corresponding "Max" values).
Now, we hit Solve.

Interesting! We get completely different results now. There are still some tower designs that don't make much sense here:
- The ground-to-ground projectile having "Remove Buffs" is a bit silly, so let's set that to 0.
- The ground-to-air projectile having direct damage + AoE splash actually seems like a really good idea! Let's try to encourage Solver to keep that solution by setting its weight to 1.5
- The homing projectile having slow direct damage also seems like a good idea, so let's set that to 1.5 as well.
- The electric arc mechanism having AoE damage only seems silly; if this is going to bounce to 3 targets in sequence, there's no point having it be AoE damage only. We'll set that to 0.
Our revised Weights Table, with all the changes we've made so far, now looks like this:

We re-solve, and get this output:
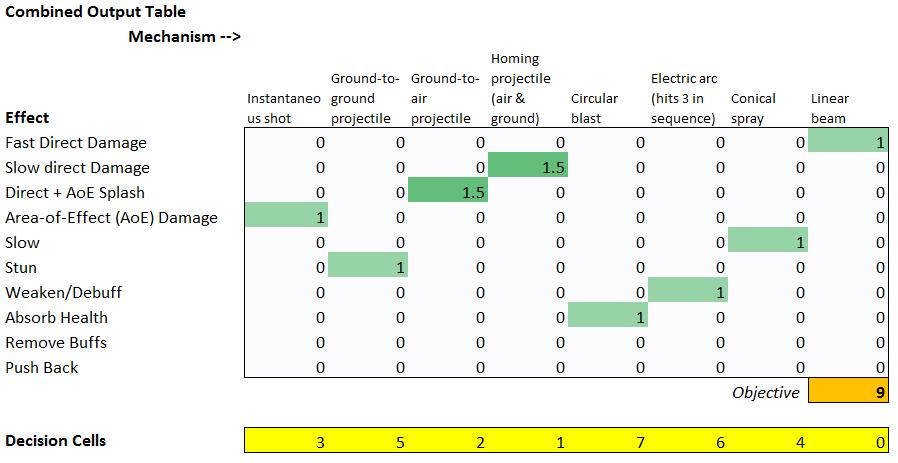
This is closer, but still no cigar; there are still some combinations that don't make sense.
For the sake of simplicity, I'll end this example here. It shouldn't take too much longer to find a good set of towers. You can easily download the spreadsheet and play around with the weights yourself; depending on what mechanism/effect combinations you prefer, any number of configurations will be valid.
If you're interested in how I solved it in my particular case, the design of the towers in City Conquest is a relatively close match.
Why It's Useful
Some readers were confused by Part 5 in this series, since the example used in that article was intentionally preposterous.By now, though, it should be clear what we were getting at. Part 5 actually gave us a number of useful decision model archetypes for solving exactly these types of parametric design problems!
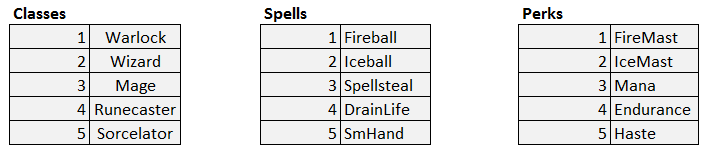
In Part 5, we were attempting to solve assignment problems between 2 or more classes of attributes (3 in the case of that particular example: classes, spells, and perks). Solving that problem allowed us to build a simple framework that we could then generalize to solve assignment problems, which are exactly the same as the parametric design problems we're addressing here.
And it should be clear by now that using this kind of a disciplined approach can be much more useful than randomly guessing at the design of our towers (or enemies, or spells, or loot, or whatever parametric design problem we're facing for our particular game), since it allows us to much more easily design each element in the context of the whole, and we can very easily experiment with alternative design configurations by tweaking a few parts of the spreadsheet and hitting "Solve."
Generalizing
Now let's take our framework and generalize further. In the attached spreadsheet, the second worksheet is labeled "Generic 2 Parameters;" you can modify this to serve as a template for these kinds of parametric design problems with 2 parameters.
This worksheet is nearly identical to the one we used in the tower defense problem above, with letters ('a'-'h') substituted for the tower attack mechanisms and random city names ("New York," "Boston," etc) substituted for the effects -- fill these in with whatever values apply to your problem. We could also use numeric parameters here for things like weapon ranges, or stuff them into broad categories to allow us to enumerate them (i.e. "Short Range," "Medium Range," and "Long Range.")
This worksheet is nearly identical to the one we used in the tower defense problem above, with letters ('a'-'h') substituted for the tower attack mechanisms and random city names ("New York," "Boston," etc) substituted for the effects -- fill these in with whatever values apply to your problem. We could also use numeric parameters here for things like weapon ranges, or stuff them into broad categories to allow us to enumerate them (i.e. "Short Range," "Medium Range," and "Long Range.")
The next worksheet in the spreadsheet is "Generic 3 Parameters," and it adds a third parameter category, which we fill in with arbitrary Greek letters to represent some arbitrary third dimension for our problem (just as with the "Spells / Perks / Classes" example in Part 5).
You can then easily create similar worksheets with 4, 5, or more parameters by adapting from the 3-parameter solution and tweaking it to suit your needs.
We also leave the implementation of problem-specific constraints as an exercise for the reader, since these constraints will inevitably be specific to the problem at hand. Part 5 contains models broadly similar to those presented here, and it may offer some useful hints as to how to implement these types of constraints.
Conclusion
Even when the problem you're facing is not a numerical one, and even when there's no way for us to find an exact optimal solution, it should be clear by now that the exercise of taking a design problem and framing it as a decision problem can have huge benefits, because it can help you see the problem in a new way and experiment with alternatives much more quickly.
Although there's a bit of a learning curve involved, once you master that, decision modeling and optimization techniques can give you a whole new power tool to approach certain classes of design problems. This process allows designers full control over the subjective aspects of the design, and uses Solver to help quickly iterate over the possibilities.
Although there's a bit of a learning curve involved, once you master that, decision modeling and optimization techniques can give you a whole new power tool to approach certain classes of design problems. This process allows designers full control over the subjective aspects of the design, and uses Solver to help quickly iterate over the possibilities.
Over the course of this series, we've illustrated a number of ways to use this power tool. We've had to slow down the pace of our posts due to other obligations, but this series is far from over.
Stay tuned! In future articles, we'll do a deeper dive into finding an optimal build order in a turn-based strategy game such as Civilization, build decision models to help us design game levels and analyze game world layouts in a Metroid Prime style of game, and much more.
-Paul Tozour
This article was edited by Professor Christopher Thomas Ryan, Assistant Professor of Operations Management at the University of Chicago Booth School of Business.